We know that the bullet drops as it travels down range.
Ballistic calculators will tell you how much the bullet drops if you give them all the proper data to calculate it.
Our scope's line-of-sight is above the barrel by an inch or two.
Gravity starts acting on the bullet as soon as it leaves the barrel.
Therefore, we have to point the barrel up in order to reach our 100yd zero.
This is to account for both the bore to scope height as well as bullet's drop from the line of departure.
This will cause the bullet to cross the line-of-sight around 85-90yds on a typical 308 load and then drop back down to your exact aiming position at 100yds.
When you are turning the scope knob, you are moving the reticle around within the scope.
Since we use the reticle to POINT the gun, what we are really doing is changing where the barrel is pointing.
So, we are using the scope's knobs to change the ANGLE of the barrel in relation to the line-of-sight.
This is really important to grasp because everything references back to the angle that you launch the bullet.
In order to hit targets that are farther away, you have to point the barrel up some more.
The graphic below calls the barrel angle the "line of departure".
With a 200yd zero, the bullet is probably crossing the line-of-sight around 50yds.
Zero it.
Before you can really use your scope, you need to zero it.
When I mount a scope on a rifle, I bore sight it.
To do this, put the rifle in a solid rest where you have at least a 50yd view.
Remove the bolt so you can look down the barrel and see something specific such as a target or perhaps a street sign or the tire of a parked car if you do this at home.
Adjust the position of the rifle so that the object is well centered in the bore and the rifle is stable so it will not move from that position.
Now look through the scope without disturbing the rifle's position.
Adjust your scope knobs until the crosshair is centered on the same object as you have centered in the bore.
Re-check the bore to be sure the barrel is still pointing at the same object and then final check that the crosshair is also adjusted to the same object.
Now you are ready for live fire.
You should be on paper at 50yds so fire 1 round at that distance and make a correction on the scope knobs if you are more than 4 inches off.
Now move out to a 100yd target and fire another round.
You should be within a few inches.
Make your final correction so that when you fire a round, it lands exactly where you were aiming at 100yds.
Now zero your scope knobs.
Every scope manufacturer has a different way of doing this, but most rely on setscrews that you loosen and slip the outer knob, or a center screw that you remove and lift the knob off, then replace in the proper zero orientation.
It does not matter how you do it as long as you end up with the "0" at the proper index park when you are at your 100yd zero setting.
Most scopes have several horizontal index lines to help you find what rotation of the knob you are on.
I recommend taking a black sharpie marker and blacking out all the lower lines, but leave just one line visible below the knob.
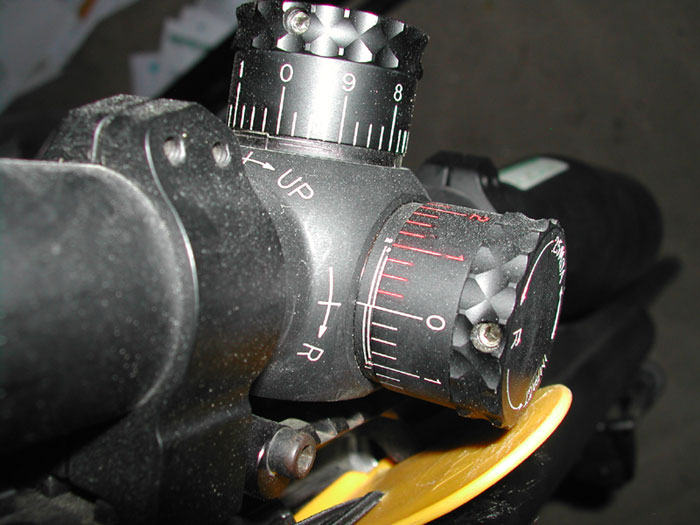
This way you will always be able to return to your proper zero position.
Later on, you will build your bullet drop data card from your 100yd zero.
You will record how much additional angle you had to add to get the bullet to hit the aiming point at further distances.
That's why a proper 100yd zero is so important as well as being able to get back to the proper 100yd zero.
It's not uncommon to become "lost in the knob" and lose which rotation you are on.
This put you WAY off your 100yd zero, usually 10" or more at 100yds.
Second Focal Plane vs. First Focal Plane.
There are two types of variable power scopes out there.
Most scopes that you will encounter are 2nd focal plane.
This means that the reticle is placed in the 2nd focal plane within the scope's optical design.
2nd focal plane reticles will not change in size when you adjust the magnification of the scope.
2nd focal place reticles are only accurate at ONE POWER SETTING.
In most cases, the reticle is accurate at the highest power setting that the scope offers.
You must know what power setting your scope is accurate at and USE THAT SETTING for all measurements.
Alternatively, we have First Focal Plane scopes.
First Focal Plane scopes have the reticle placed in the first focal plane of the scope's optical design.
This means that the reticle appears to change size within the scope as you adjust the magnification.
The reticle is actually staying the SAME SIZE in relation to the target you are observing.
This is a huge benefit because the reticle is now accurate at ALL POWERS.
This allows you to hold-off or MIL targets at any power without having to be concerned that you are on the proper scope setting.
The major advantage of first focal plane scopes is being able to use the reticle at lower powers where you have more field-of-view.
This increased field-of-view enables you to move quickly from one target to the next.
The major disadvantage of first focal plane scopes is that the crosshairs often become very thick at higher powers.
The thick crosshair can obscure small targets, which makes it harder to be precise on very small targets.
The advantage of second focal plane scopes is that the reticle size does not change so you can be more precise on small targets.
The major disadvantage of second focal plane scopes is that they must be used on a specific magnification setting in order for the reticle to be accurate.
This usually means that you will not have as much field-of-view as you will be on a higher power setting.
Fixed power scopes all behave the same as a first focal plane because they do not have any magnification adjustment.